With voice assistants becoming ubiquitous, we get used to things listening to us. In this article we explore how to get a headless RaspberryPi Zero W to be our offline voice assistant.
Disclaimer: This is a work in progress. This one is just barely working. And I didn’t even proofread it thoroughly.
Hardware
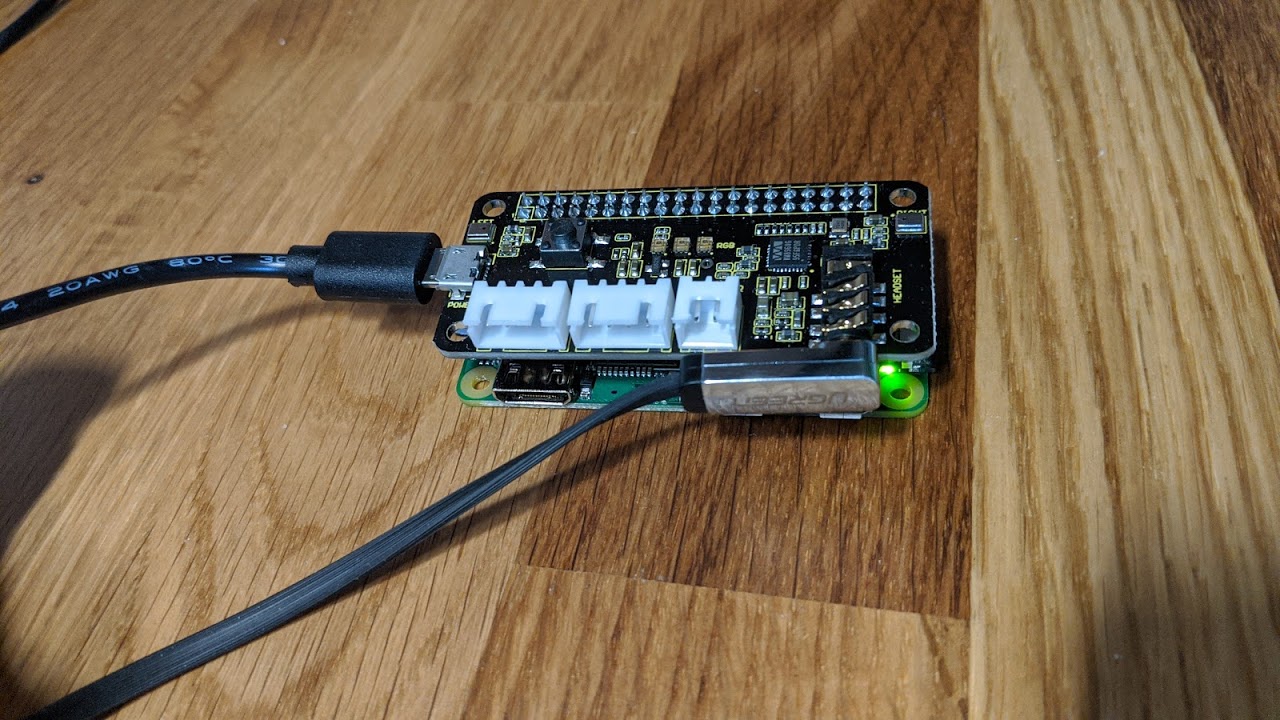
We are using a RaspberryPi and a Keyestudio ReSpeaker 2-Mic Pi Hat, which was initially designed by seeedstudio. The components look like this:
The SD card is a massively oversized U1 (for 100 MiB/s) one:
Disk /dev/mmcblk0: 183,4 GiB, 196865949696 bytes, 384503808 sectors
Units: sectors of 1 * 512 = 512 bytes
Sector size (logical/physical): 512 bytes / 512 bytes
I/O size (minimum/optimal): 512 bytes / 512 bytes
Disklabel type: dos
Disk identifier: 0x00000000

Device         Boot Start       End   Sectors   Size Id Type
/dev/mmcblk0p1      32768 384503807 384471040 183,3G  7 HPFS/NTFS/exFAT
Software
Download a Raspbian Lite image from here: https://www.raspberrypi.org/downloads/raspbian/.
sudo dd bs=4M if=2019-09-26-raspbian-buster-lite.img of=/dev/mmcblk0 status=progress conv=fsync
And here we enjoy the U1 quality of our SD card:

After dd-ing the image we mount it, enable ssh and prepare WLAN access:
cd /media/rawland/boot
touch ssh # enable ssh
touch wpa_supplicant.conf # we enter WIFI in a second
Open wpa_supplicant.conf with your favorite editor and enter:
ctrl_interface=DIR=/var/run/wpa_supplicant GROUP=netdev
update_config=1
country=US

network={
    ssid="YOURSSID"
    psk="YOURPASSWORD"
    scan_ssid=1
}
watch out that your country code might be different!
I’m missing HypriotOS at this point already… but that’s for another day. First we follow the known path.
Next we enable UART in the config.txt inside of the boot partition by adding
# Enable UART
enable_uart=1
at the bottom of the file. By that we can add a USB console later for debugging.
After unmounting we put the SD card into the Raspberry Pi Zero W and plug in a USB cable. Following that it will boot (intense blinking of a green LED on the board).
After it booted (and the blinking stopped), we search for it on the network:
sudo nmap -sn 192.168.xxx.0/24
or whatever your IP range is.
Then we log in using pi:raspberry as the login:password combination
ssh pi@raspberrypi.whatever
change our password as recommended.
You can now adapt the Pi to your needs. Like expanding the filesystem and such using sudo raspi-config which is mostly self-explanatory. It is further recommended to enable SPI and I2C there as they are used quite often. We’ll need the SPI specifically later on. You can find them in Interfacing Options and the fs expansion in Advanced Options.
Update everything:
sudo apt update
sudo apt upgrade
Install git
sudo apt install git
ReSpeaker
When the ReSpeaker is connected well, you can power the setup over its Micro USB port, too. That’s what I did.
Then, let’s install seeedstudio’s voice card:
git clone https://github.com/respeaker/seeed-voicecard.git
cd seeed-voicecard
sudo ./install.sh
reboot
This installs:
Suggested packages:
  python3-apport menu libi2c-dev python-smbus jackd2 opus-tools pulseaudio librsvg2-bin
  lm-sensors speex
The following NEW packages will be installed:
  dkms fontconfig fontconfig-config fonts-dejavu-core i2c-tools libaom0 libasound2-plugins
  libasyncns0 libavcodec58 libavresample4 libavutil56 libcairo2 libcodec2-0.8.1 libcroco3
  libdatrie1 libdrm-amdgpu1 libdrm-common libdrm-nouveau2 libdrm-radeon1 libdrm2 libflac8
  libfontconfig1 libgdk-pixbuf2.0-0 libgdk-pixbuf2.0-bin libgdk-pixbuf2.0-common libgl1
  libgl1-mesa-dri libglapi-mesa libglvnd0 libglx-mesa0 libglx0 libgraphite2-3 libgsm1
  libharfbuzz0b libi2c0 libice6 libjack-jackd2-0 libjbig0 libllvm8 libmp3lame0 libogg0
  libopenjp2-7 libopus0 libpango-1.0-0 libpangocairo-1.0-0 libpangoft2-1.0-0 libpixman-1-0
  libpulse0 librsvg2-2 librsvg2-common libsensors-config libsensors5 libshine3 libsm6
  libsnappy1v5 libsndfile1 libsoxr0 libspeex1 libswresample3 libthai-data libthai0 libtheora0
  libtiff5 libtwolame0 libva-drm2 libva-x11-2 libva2 libvdpau-va-gl1 libvdpau1 libvorbis0a
  libvorbisenc2 libvpx5 libwavpack1 libwebp6 libwebpmux3 libx11-xcb1 libx264-155 libx265-165
  libxcb-dri2-0 libxcb-dri3-0 libxcb-glx0 libxcb-present0 libxcb-render0 libxcb-shm0
  libxcb-sync1 libxcb-xfixes0 libxdamage1 libxfixes3 libxi6 libxrender1 libxshmfence1
  libxtst6 libxvidcore4 libxxf86vm1 libzvbi-common libzvbi0 mesa-va-drivers
  mesa-vdpau-drivers raspberrypi-kernel-headers read-edid va-driver-all vdpau-driver-all
  x11-common
If everything went fine the last lines should look like this:
------------------------------------------------------
Please reboot your raspberry pi to apply all settings
Enjoy!
------------------------------------------------------
and thus we simply follow the instructions and sudo reboot.
Afterwards you can check if everything works by plugging a headset into the ReSpeaker with a cable and running this command:
arecord -f cd -Dhw:1 | aplay -Dhw:1
If we say something, we will hear what we say with a huge delay. If this doesn’t work, check if the sound card 1 name matches seed-2mic-voicecard by comparing the outputs of aplay -l and arecord -l.
We can configure everything with alsamixer if stuff is too loud and such.
Next we check the LEDs onboard. It’s always nice to see if the audio is received.
sudo apt install python-pip -y
sudo pip install spidev
cd ~/
git clone https://github.com/respeaker/mic_hat.git
cd mic_hat
python pixels.py
And now the button
sudo pip install rpi.gpio
and create a file button.py with the content below. We can use whatever editor we want. I like vi(m). (sudo apt install vim) 😊.
If your terminal supports emoji this is quite fun:
#!/usr/bin/env python
# -*- coding: utf-8 -*-
import RPi.GPIO as gpio
import time

B = 17

gpio.setmode(gpio.BCM)
gpio.setup(B, gpio.IN)

print("We check the state of the button every second.")
print("If you keep it pressed, it should say '😲', else '😑'")

while True:
        state = gpio.input(B)
        if state:
                print("😑")
        else:
                print("😲")
        time.sleep(1)
which results in:

else:
import RPi.GPIO as gpio
import time

B = 17

gpio.setmode(gpio.BCM)
gpio.setup(B, gpio.IN)

print("We check the state of the button every second.")
print("If you keep it pressed, it should say 'pressed', else 'off'")

while True:
        state = gpio.input(B)
        if state:
                print("off")
        else:
                print("pressed")
        time.sleep(1)
Intermission (former Conclusion):
We set up our hardware and installed an operating system. Next we downloaded all necessary Python libraries and a bunch of source code from seeedstudio. Following that we tested the microphones, the speaker, the LEDs and the button.
Next, we set up an offline environment for speech recognition. That is Rhasspy. If you don’t care about this and are OK with using Google, Baidu or Amazon’s Alexa APIs, feel free to follow the sources below.
Docker (just read this, it doesn’t work)
Now I regret not using HypriotOS directly. Ah, we’ll do this in the end once more. Right now we are too far into it. At least we are on the Long Term Support side of things.
Install Docker with
curl -sSL https://get.docker.com | sh
let’s add our user with
sudo usermod -a -G docker $USER
and we discover that this might be a bit too much for the zero, when looking at top.
Virtual Environment (this works)
Let’s start without Docker:
git clone https://github.com/synesthesiam/rhasspy.git
and luckily we have almost a ready made bed. Almost, because we need to disable Kaldi:
DEFINE_boolean 'kaldi' false 'Install Kaldi'
in create-venv.sh because Kaldi is not supported this is expected.
Then
cd rhasspy/
./download-dependencies.sh
./create-venv.sh
Ignore the messages about the failing Kaldi. They come from download-dependencies.sh and it’s not supported on the armv6l platform. :/
The overall downloads above take a while…
After this:
./run-venv.sh --profile en
if all is well, rhasspy should run at
http://early.whatever:12101
Conclusion
In this article we set up the tiny Raspberry Pi Zero WH with the ReSpeaker 2 Mics. We set everything up using Raspbian and seeedstudio’s software stack. Rhasspy installed the regular stack, omitting Kaldi (which is unfortunate). Basically, everything works. However, the Zero is so weak that it takes a very long time to even understand short sentences. I’ll show a gif soon. Therefore, I shift this to the Raspberry Pi 4B and see how well this one performs.